
Soft plaster finish diy tutorial: easy steps to succeed

Ready to elevate your home’s aesthetic with a touch of timeless elegance? A Soft plaster finish DIY tutorial offers the perfect guidance for achieving a beautifully textured wall surface.
Have you ever wished you could create that sophisticated, artisanal look at home without the hefty cost of hiring professional tradespeople?
This specialized coating, known for its smooth yet subtly tactile appeal, is the key to transforming your living space. Follow our expert-led steps to ensure a flawless, durable result that you’ll be proud of.
Understanding soft plaster and its benefits
Understanding soft plaster is essential for any DIY enthusiast looking to elevate their home’s interior. This unique finish not only enhances aesthetic appeal but also provides several practical benefits.
Soft plaster, characterized by its smooth, textured appearance, is made from a mix of lime, gypsum, or cement. It can transform an ordinary wall into a work of art.
One of the main advantages of using soft plaster is its flexibility. Unlike regular paint, which can crack over time, soft plaster can adapt to minor shifts in the wall structure.
Key Advantages of Soft Plaster
In addition to its flexibility, soft plaster offers several other benefits:
- Durability: Soft plaster is long-lasting and can withstand wear and tear.
- Environmentally Friendly: Most soft plaster materials are non-toxic and sustainable.
- Texture Variety: It provides a range of textures, allowing you to customize your space.
- Good Insulation: Soft plaster also helps with temperature regulation in your home.
When considering a soft plaster finish, it’s important to note that the application process is key. Proper preparation of the wall surface can significantly impact the final look.
Make sure to clean and patch any imperfections before applying the plaster for the best results.
Furthermore, the drying time is crucial. Allow the plaster to dry completely to develop the right texture. This drying phase can affect the overall finish, so patience is essential.
Overall, a soft plaster finish not only beautifies your space but also offers longevity and practicality. Understanding these benefits will help you make informed choices on your DIY journey.
Essential tools for your diy project
When embarking on your DIY journey with a soft plaster finish, having the right tools is crucial for success. Essential tools will not only make the process easier but also ensure a high-quality finish.
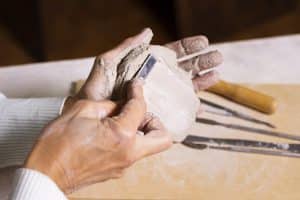
The foundation of your toolkit includes several basic items you shouldn’t overlook. A strong, durable trowel is necessary for applying plaster evenly.
Choose one that feels comfortable in your hand and is suitable for the type of plaster you’re using.
Must-Have Tools for Soft Plaster Application
- Mixing Bucket: A sturdy bucket is essential for mixing your plaster to the right consistency.
- Hawk: A hawk is a flat board with a handle, perfect for holding and transporting plaster as you work.
- Float: A float helps smooth the plaster surface, giving it a polished appearance.
- Sandpaper: Use sandpaper to gently smooth any rough spots after the plaster has dried.
In addition to these primary tools, consider having a spray bottle on hand. A spray bottle filled with water can be beneficial for misting the plaster as it dries, preventing it from cracking.
It’s also wise to wear protective gear, such as gloves and goggles, to safeguard yourself during the process.
Each tool plays a vital role in achieving the desired finish. Investing in quality tools will pay off in the long run. Moreover, organizing your workspace can streamline the application process.
Having everything within reach will make your job easier and more enjoyable.
As you prepare for your project, gathering these essential tools will set you up for success. The right equipment will empower you to create a stunning soft plaster finish in your home.
Step-by-step guide to applying soft plaster
Applying soft plaster can seem daunting, but following a step-by-step guide makes it manageable. Understanding the process is key to achieving a beautiful finish.
Start by preparing your workspace and materials. Make sure you have all your tools ready, including the mixing bucket and trowel. It’s important to work in a well-ventilated area to prevent dust accumulation.
Preparing the Surface
Before applying any plaster, the surface must be properly prepared. This involves cleaning the surface and ensuring it is free of dust, grease, or old paint. Patch any holes or imperfections to create a smooth base.
Afterward, dampen the surface slightly using water. This will help the plaster adhere better.
Mixing the Plaster
Next, it’s time to mix the plaster. Follow the manufacturer’s instructions for the correct water-to-plaster ratio.
Pour the plaster into the mixing bucket, add the water, and use a mixer or trowel to blend until you achieve a smooth consistency. Allow the mixture to rest for a few minutes for the ingredients to fully combine.
Applying the Plaster
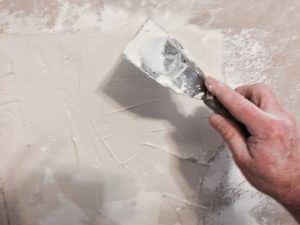
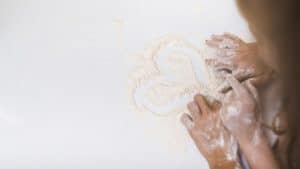
Now, the fun part begins. Use your trowel to scoop a generous amount of plaster. Start applying it to the wall from the bottom up. Spread it in a thin, even layer, using smooth, sweeping motions.
Don’t worry about achieving perfection right away; you can always add more plaster to create the desired texture later.
- Work in small sections: This helps manage the drying time effectively.
- Feather the edges: Use the trowel to smooth out the edges of each section as you go.
- Build up layers: For enhanced texture, consider adding multiple thin layers instead of one thick layer.
After applying the plaster, let it dry according to the manufacturer’s guidelines. This can take anywhere from a few hours to a day, depending on the environment.
Once dry, use a float to refine the surface and achieve a polished look. For final touches, sand down any rough spots to ensure a smooth finish.
By breaking down the process into these clear steps, applying soft plaster becomes a rewarding DIY project. Following this guide will help you achieve a stunning finish that enhances your home’s interior.
Common mistakes to avoid during application
When applying soft plaster, avoiding common mistakes is crucial for a successful finish. Understanding these issues helps ensure your project goes smoothly.
One frequent error is failing to properly prepare the surface. If the wall has dust, grease, or old paint, the plaster may not adhere well. Ensure you thoroughly clean and patch any imperfections before you start.
Top Mistakes to Avoid
Being aware of certain pitfalls can save you time and effort. Here are some key mistakes to steer clear of:
- Using too much water: Adding excess water to the plaster mixture can weaken it and cause cracking.
- Rushing the drying process: Trying to apply another coat before the first one has fully dried can ruin the texture.
- Not mixing adequately: Poorly mixed plaster may lead to lumps, affecting the finish. Ensure that the mixture is smooth and uniform.
- Ignoring temperature and humidity: Applying plaster in extreme temperatures or high humidity can impact how it sets and dries.
Another mistake is applying plaster too thickly in one layer. This can lead to uneven drying and cracking. Instead, opt for multiple thin layers for better results. Each layer should dry completely before adding the next one.
Lastly, neglecting proper tools can also create issues. Use quality tools designed for plastering, as they will aid in achieving the best results. A good trowel, for example, makes it easier to spread the plaster evenly.
By being mindful of these common mistakes, you can avoid frustration and achieve a beautiful soft plaster finish in your home.
Tips for achieving a flawless finish
Achieving a flawless finish when applying soft plaster is the goal of every DIY enthusiast. With the right tips, you can enhance your results and create a beautiful surface.
First, focus on your workspace. Ensure it is clean and well-lit, as this makes it easier to see any imperfections as you work. Having a tidy area reduces distractions and allows for better focus.
Essential Tips for a Perfect Finish
Here are some essential tips to keep in mind when working with soft plaster:
- Use proper technique: Apply the plaster in thin, even layers. A trowel should be held at a slight angle, which helps spread the plaster smoothly.
- Watch the drying time: Allow each layer to dry fully before adding the next. This prevents cracking and ensures even adherence.
- Maintain the right pressure: When smoothing the plaster, use consistent pressure. Too much pressure can remove too much material, while too little can leave rough spots.
- Feather the edges: Blend the edges of each plaster layer into the previous one. This technique helps create a seamless look that feels more professional.
Additionally, consider using a light mist of water on the surface while working with plaster that is drying. This can minimize cracking and improve the texture. Make sure to have a sponge handy to smooth out any areas that look uneven.
Regularly step back and inspect your work from different angles. This will help you spot areas that may need additional attention. Touch up spots where necessary, ensuring every part of the wall meets your standards.
Finally, once you achieve a smooth finish, resist the urge to over-sand the surface. Lightly sand any rough spots, but avoid removing too much material, which can compromise your work.
Maintenance and repair of soft plaster surfaces
Maintenance and repair of soft plaster surfaces are essential for keeping your walls looking fresh and beautiful. With time, even the best plaster may develop minor issues that need attention.
Regularly inspecting your plaster surfaces can help you catch problems early. Look for signs of wear, such as cracks, chips, or discoloration. Addressing these issues promptly prevents them from worsening and becoming more costly to repair.
Common Issues and How to Fix Them
Soft plaster can face several common issues, including:
- Crazing: This is a network of fine cracks on the surface. To repair crazing, clean the area and apply a thin layer of fresh plaster, feathering the edges for a smooth finish.
- Chipping: If chunks have come off, you’ll need to patch these areas. Remove any loose plaster, dampen the surface, and apply new plaster to fill the gaps.
- Discoloration: Stains from water or dirt can occur. Clean the affected area with a mild detergent solution. If stains persist, repaint the section with matching paint or touch up with new plaster.
- Moisture damage: If you notice signs of dampness, it’s crucial to identify and fix the source of moisture. Once resolved, you can patch and repaint the affected areas.
When performing maintenance, always ensure the surface is clean and dry before applying any patches or paint. Using the right tools and materials is vital for effective repairs. For small repairs, a trowel and sandpaper will be helpful.
Additionally, to prolong the life of your soft plaster surfaces, consider using a sealant.
A good-quality sealant can protect against moisture and stains, making maintenance easier in the long run. Regular dusting and gentle cleaning will also help keep your plaster looking its best.
Conclusion: Embrace the Beauty of Soft Plaster
Embracing the Soft plaster finish DIY project is a deeply rewarding endeavor that results in walls possessing a beauty and depth unmatched by standard paint.
By understanding the material’s benefits—including its durability, breathability, and aesthetic versatility—and following precise application steps, you can confidently achieve a flawless, professional-grade finish in your home.
Remember that the texture options for your finish are vast and can dramatically alter the look and feel of a room, ranging from the smooth sheen of Marmorino to the granular appearance of a sand finish.
For more inspiration on the diverse textures and finishes you can achieve with natural plasters, explore resources like the Straw Bale Blog, which offers extensive visual guides: Finish Plaster Texture Options.
FAQ – Frequently Asked Questions about Soft Plaster Finishing
What is soft plaster and why should I use it?
Soft plaster is a mixture applied to walls to create a smooth, textured finish. It enhances the aesthetic appeal of interiors and is more durable than regular paint.
How can I fix small cracks in my soft plaster?
To fix cracks, clean the area, dampen it slightly, and apply a thin layer of fresh plaster over the crack, feathering the edges for a smooth look.
What tools do I need for applying soft plaster?
Essential tools include a trowel, mixing bucket, hawk, and sandpaper. These will help you evenly apply and finish the plaster.
How do I maintain my soft plaster surfaces?
Regularly inspect for cracks or discoloration, clean with mild detergent, and repair any damage promptly to keep your soft plaster looking fresh and lasting longer.
Liked the article?


